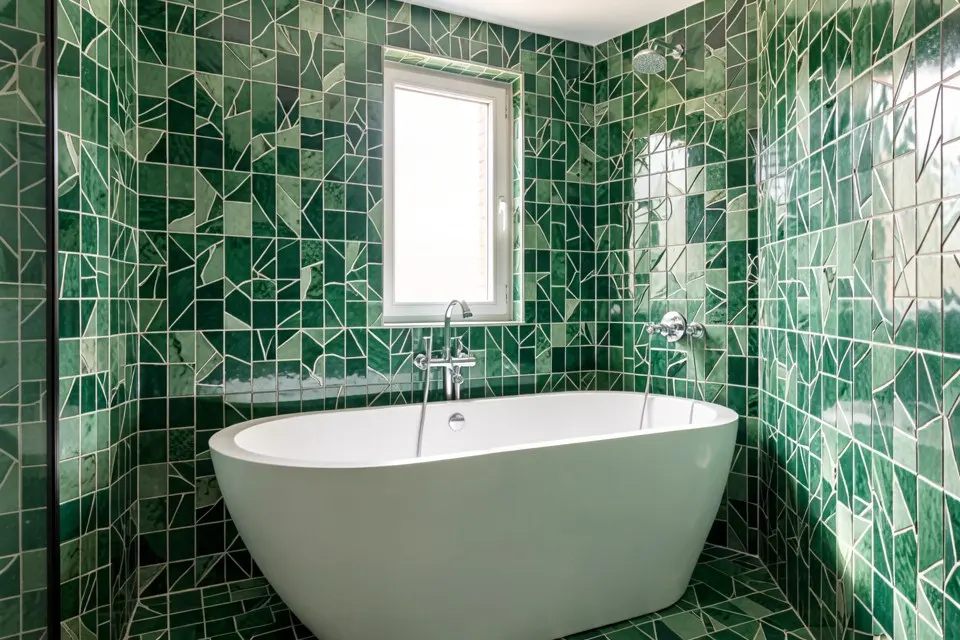
Bathroom tile looks right when three things line up: the tile size suits the room size, the layout lines up with the fixtures, and the grout colour is chosen as carefully as the tile. The tile itself is often the least important decision. The bathroom tile ideas below start with those rules, then go through looks that last, slip safety, how high to tile and what it all costs per square metre.
Size: bigger than you think for small rooms
The instinct in a small bathroom is small tiles. It usually does the opposite of what you want. A 2 × 2.5 m floor in 10 × 10 cm tiles has roughly 900 grout joints; in 60 × 60 cm tiles it has about 20. Every joint is a line the eye has to cross.
- Floors in small bathrooms: 60 × 60 cm or 60 × 120 cm porcelain. If the room is under 4 m², 60 × 60 cm is easier to cut around the toilet and basin without wasting half a tile.
- Walls: large format again for a calm look, or a vertical format (7.5 × 30 cm or 6.5 × 20 cm) laid vertically to make a low ceiling feel taller.
- Shower floors: mosaic (5 × 5 cm or smaller) if the floor falls to a centre drain, because small tiles follow a four-way slope. With a linear drain along one wall, the floor only falls one way and you can keep the large tiles running straight in.
- Large bathrooms: here smaller, more characterful tiles (hexagons, zellige, patterned encaustic) have space to be seen as a pattern rather than as noise.
Very large slabs (120 × 240 cm and up) look superb but need a flat substrate, two fitters and often a crane or a long staircase conversation. Budget €40–€80 per m² extra for the handling alone.
Layout: line up with what you see first
Before choosing a pattern, decide where the first full tile goes. Tilers start in a corner by default; the right answer is almost always to centre the layout on the thing you look at when you open the door: the vanity, the bath, or the back wall of the shower. That way the cuts end up in the corners behind the door where no one looks.
Common layouts and what they do:
- Straight stack (grid): calm and modern. Needs straight walls because every error shows. Best with large formats.
- Offset by one third: hides small wall irregularities and avoids the lipping that 50% offsets cause on long rectangular tiles. For tiles longer than 60 cm, never offset by half.
- Vertical stack: the easiest way to add height. Works well with slim tiles in a shower.
- Herringbone or chevron: adds movement on a floor or a single feature wall. Costs 15–25% more in labour and 10–15% more in waste.
- Half-height wall tile with paint above: a traditional, cheaper look. Tile to 1.2 m around the room, and full height inside the shower only.
Line up grout joints with the edges of the niche, the vanity top and the mirror where you can. Nothing looks more expensive than a shower niche that sits exactly between joints, and nothing looks cheaper than a sliver of tile above it.
Grout: the decision that changes everything
The same white tile looks completely different with white, grey or charcoal grout. Choose grout deliberately:
- Matching grout (same tone as the tile) gives a seamless, larger-looking surface. The default for small bathrooms and for large-format porcelain.
- Slightly darker grout (one or two shades) hides dirt on floors and still reads calm. Mid-grey on a light floor is the most forgiving choice for family bathrooms.
- Contrasting grout (charcoal on white metro tiles) turns the grid itself into the pattern. Striking, but it amplifies every uneven joint, so it needs a careful tiler.
Epoxy grout costs about three times as much as cement grout (€15–€25 per kg versus €5–€8) and is harder to apply, but it does not stain, does not need sealing and is the right choice inside a shower. Many tilers use epoxy in the shower and cement grout elsewhere.
Joint width matters too: 2 mm for rectified porcelain, 3–5 mm for handmade or non-rectified tiles. Wider joints on handmade tiles are not sloppiness; they absorb the size variation.
Looks that do not date in five years
Trends in bathroom tile move fast. These are the looks that have held up over decades and still read current:
- Stone-look porcelain: marble, travertine or limestone effect. Real stone looks and none of the sealing. Choose a pattern with at least 10–15 different faces so the repeat does not show.
- White or cream metro tiles: 7.5 × 15 cm or 10 × 20 cm, with a slight crackle or handmade edge for depth. The safest wall tile there is.
- Zellige and handmade tiles: irregular, glossy, full of variation. Beautiful in green, blue, warm white or terracotta. Expect €90–€200 per m² and plan more waste.
- Terrazzo: porcelain or real; strong on floors, playful without being loud.
- Two-tone: a darker floor tile carried 1.2 m up the wall, light tile or paint above. Grounded and quietly graphic.
If you are updating more than the tiles, our bathroom redesign ideas cover lighting, storage and vanities, which change how any tile reads. For colour choices on walls you paint rather than tile, the undertone method applies just as it does in living rooms: a cool grey tile next to a warm cream paint looks grubby.
Slip resistance and practical specs
Pretty tiles that are slippery when wet are a real hazard. Check the ratings before ordering:
- Floors: R10 minimum in a bathroom, R11 for a walk-in shower floor. In the US and some other markets, look for a wet DCOF of 0.42 or higher.
- Polished and high-gloss floor tiles: fine for walls, a bad idea on a bathroom floor.
- Water absorption: porcelain absorbs less than 0.5% and is right for everywhere. Ceramic wall tiles absorb more but are fine on walls outside direct spray.
- Waterproofing: tiles and grout are not waterproof. Showers need a liquid or sheet membrane under the tile, with sealing tape in all corners. It costs €15–€35 per m² and is the single thing you should never let anyone skip.
How high to tile
- Full height everywhere: cleanest look and easiest to clean. Most expensive.
- Full height in the shower, 1.2 m elsewhere: the classic balance of budget and practicality.
- Only wet zones: floor, shower walls to full height, a splashback behind the basin (60 cm above the vanity). Paint everything else with a moisture-resistant bathroom paint. Cheapest and perfectly durable if the room is well ventilated.
Whatever height you pick, end on a full tile or a trim, never on a cut sliver just below the ceiling. If the numbers do not work, drop the tiles to a height that does, such as the top of the door frame.
What bathroom tiling costs
Rough 2026 figures for Western Europe, tile plus labour:
| Item | Cost per m² |
|---|---|
| Budget ceramic or porcelain, straight lay | €60–€100 |
| Mid-range porcelain, large format | €100–€170 |
| Zellige, handmade or natural stone | €170–€320 |
| Removing old tiles | €15–€30 |
| Waterproofing membrane | €15–€35 |
| Herringbone or complex patterns | +15–25% labour |
For a typical 5 m² bathroom with around 20 m² of wall to tile, the total ranges from about €1,500 to over €6,000. Add 10% to the tile quantity for waste, 15% for diagonal and herringbone layouts, and buy it all from one batch so the shade does not shift halfway up a wall. A realistic renovation budget also keeps 10–15% aside, because opening a bathroom wall often reveals plumbing or damp that has to be fixed first.
Five bathroom tile combinations that work
- Calm spa: 60 × 120 cm warm grey stone-look porcelain on the floor and walls, matching grout, a single niche lined with the same tile.
- Classic: white metro tiles to 1.2 m with a pencil trim, black and white hexagonal mosaic floor, painted wall above in a soft green.
- Warm handmade: terracotta floor tiles, cream zellige in the shower, oak vanity.
- Graphic: black slim vertical tiles on the shower back wall only, large white porcelain everywhere else.
- Small but bright: the same pale 60 × 60 cm tile on floor and all walls, one colour accent in the vanity or in a painted ceiling.
Try the tile before the tiler arrives
Tile samples are small and bathrooms are lit badly. Buy at least two full-size tiles of each option, stand them in the actual room and look at them with the bathroom light on at night. Most tile regret comes from choices made in a showroom under daylight.
For the overall effect, a photo of the existing bathroom run through Room Redesign in Homie shows the room with different tile styles in minutes, keeping the layout and fixtures in place. Use it to narrow three ideas down to one before you order samples, then confirm with the real tiles in the room.
Decide in this order: size, layout start point, grout colour, then the tile itself. It sounds backwards, but those three decisions are what people notice, even when they think they are looking at the tile.